As I mentioned in Part 4 – Tap and Layout, when I finished the install and finally got a chance to listen to it … well, it didn’t sound right at all. In some songs the bass felt surprisingly weak. In others, it was booming and overpowering. The most frustrating, though, were songs that did both!
I spent over two hours one night trying to get this right. I kept running between the cabin and the trunk, adjusting the crossover, and trying again. When I finally managed to get one song sounding good another song sounded worse. When I could get the second song sounding good, the first sounded terrible again. It was maddening!
As with other parts of this project, clues came to me in the form of Travis’ blog. In his Part 2, when Travis took measurements of the stock system he noted a significant boost around 50 Hz. This seemed to match what I was hearing and fighting with. Then it dawned on me: Travis never complained about excessive booming because his entire system was calibrated with a DSP.
So what’s a DSP?
DSP stands for Digital Signal Processor. In audio, a DSP is a device that takes sound in on one channel, modifies the sound in some way, then sends the modified sound out another channel. DSPs can do all kinds of helpful things, but one of the most valuable is equalization. What do we mean by equalization?
Even the most basic sound systems usually have Bass and Treble knobs.
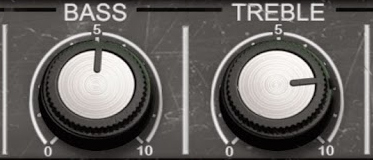
Usually Bass is on the left and Treble on the right. There’s a reason for this, which we’ll see in a minute.
If the system is more advanced, it might include a knob for Mid-range too.

The Mid knob adds control over the frequencies of sound between Bass and Treble.
Taking it a step further, maybe you’ve seen something like this before?
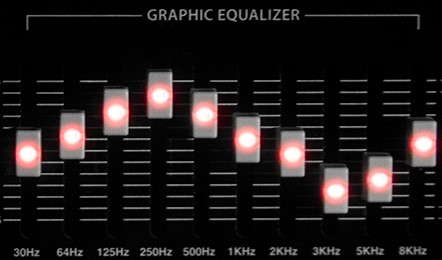
A 10-band equalizer like the one above is like having 4 knobs for Bass, 3 knobs for Mid and 3 knobs for Treble. Again, Bass left and Treble right. And we can keep going!

The more sliders we add, the more fine-grained control we have over how loud specific frequencies sound.
A DSP can work like a programmable equalizer. In fact, here’s a screenshot of a DSP configured to work like the 31-band equalizer pictured above (though with different settings, obviously).
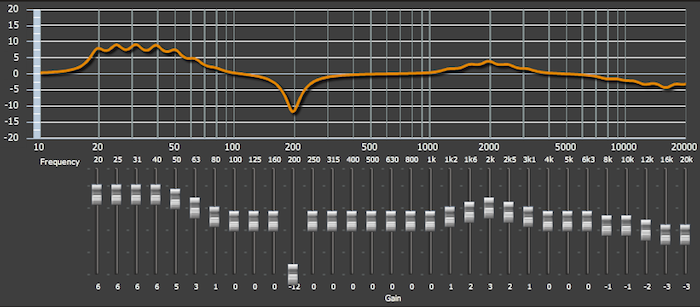
DSPs even support something called “Parametric EQ”, which is kind of like having a virtually unlimited number of sliders! But I’m getting ahead of myself.
Solving for Sound
By now you can probably see where this is going: We can use a DSP to turn down the frequencies Tesla made too loud at the factory. This process is called “calibration” and it deserves an entire article of it’s own. In fact, that’s exactly what the final post in this series will be. The remainder of this post will cover calibration at a high level and provide you with the files I created during my own calibration. Files you can use in your system too.
So what DSP will we be using? In his install, Travis combined a FiX-82 with a TwK-88 in order to calibrate every single speaker in his system. This was damn cool, but it also represented a roughly $830 investment! This was waaay overkill for my needs. Since I only wanted to calibrate the subs, I found a solution that’s much cheaper yet still retains the flexibility and reliability found in more expensive systems. I chose the venerable miniDSP 2×4.
At $104, some will ask “Does it even work?” Others will ask “Is the difference really worth a hundred bucks?” I’m happy to say that the answer to both questions is an emphatic “Yes!!!”. Let’s see how such a tiny device can make such a massive difference in sound.
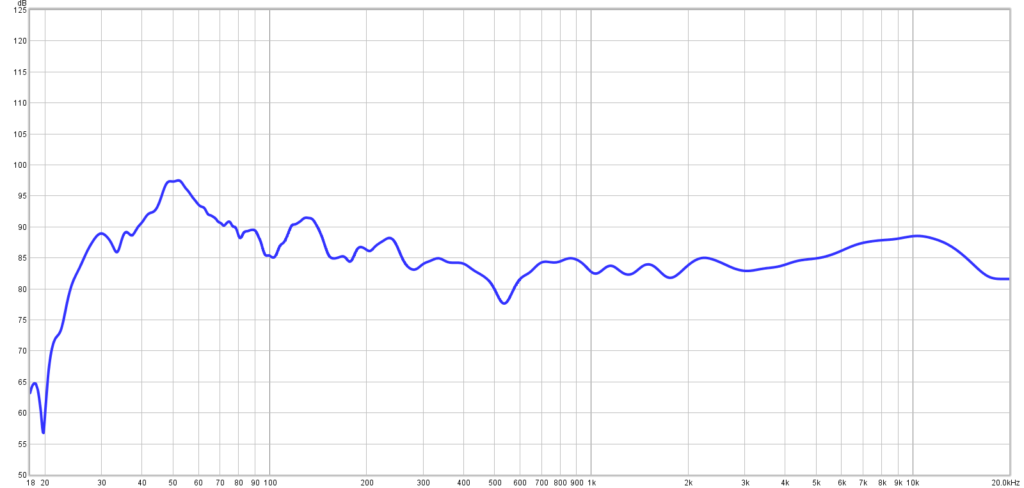
This is the response curve for Model 3 Premium sound without any subs installed:
It may not be obvious at first, but there’s a huge bump around 50 Hz. If you click the image to zoom in you can see that treble frequencies peak just under 90 dB but frequencies close to 50 Hz peak at around 97 dB. That’s a difference of around 8 dB. 8 dB may not sound like much, but every increase of 10 dB sounds twice as loud!
Also, notice how quickly that peak slopes off on either side of 50 Hz? This is why some songs sound punchy and responsive in the 3 while others seem flat with no bass at all. If the beat track is close to 50 Hz, you’re really going to hear it!
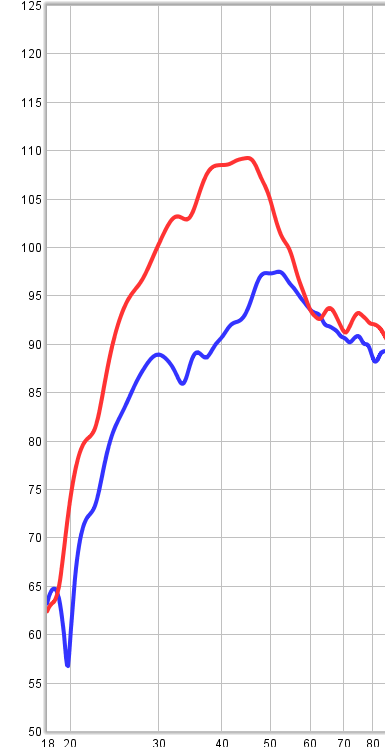
Now let’s see what happens when we add dual 10″ subwoofers in a ported enclosure to the 3:
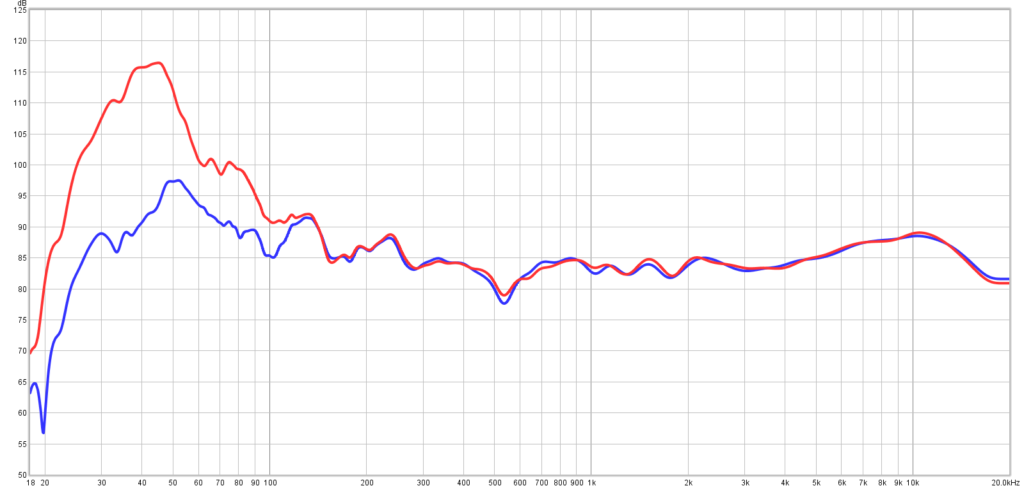
Wow. This is the response curve with no DSP and just look at that peak! It’s like Mount Everest!! “But what about adjusting the gain” you ask? Well, keep in mind that the blue line represents the stock audio system. So even if we turn the subs completely off, we can’t go below that line. Let’s zoom in to 85 Hz (the frequency most manufacturers recommend as the starting point for the low-pass filter) and turn the gain down to match.
We’ve managed to extend the low-end bass response over there on the left, but we still have waaay too much power between 40 and 50 Hz. What about adjusting the low-pass filter on the amp? Well, that only adjusts the right side of the curve. It simply can’t compensate for that horrendous boost!
What we need is a way to flatten the red peak down towards the blue peak without giving up the extension on the left. What we need is equalization! In Part 8 I’ll cover exactly how I achieved these results, but I’m delighted to share with you my new DSP calibrated response curve:
As before, let’s zoom in to 85 Hz and adjust the gain to match.
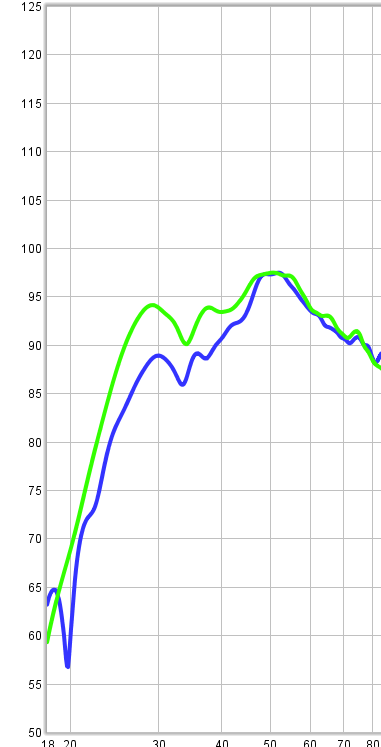
The response at 50 Hz now matches the stock system. And look at the bass extension we’ve managed to keep, all the way down to 30 and even 25 Hz! A picture may be worth a thousand words, but this is a difference you really do need to hear (and feel) for yourself.
Installing the DSP
It’s time to install the DSP, but first a prudent warning.
As stated in the manual:
It should go without saying, but I can’t be responsible for any damage caused to your system so please do be careful!
Alright. With that out of the way, here is your shopping list!
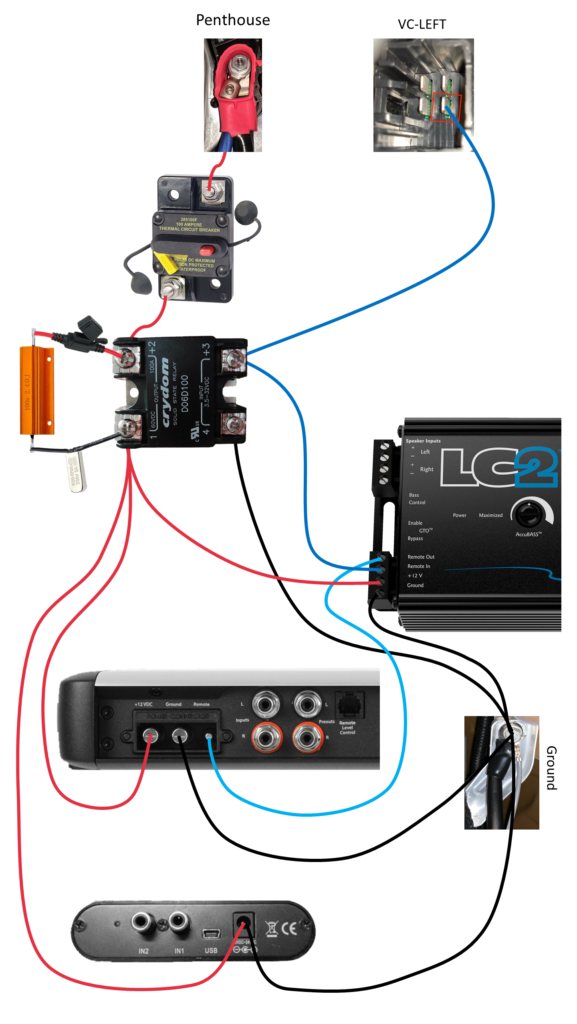
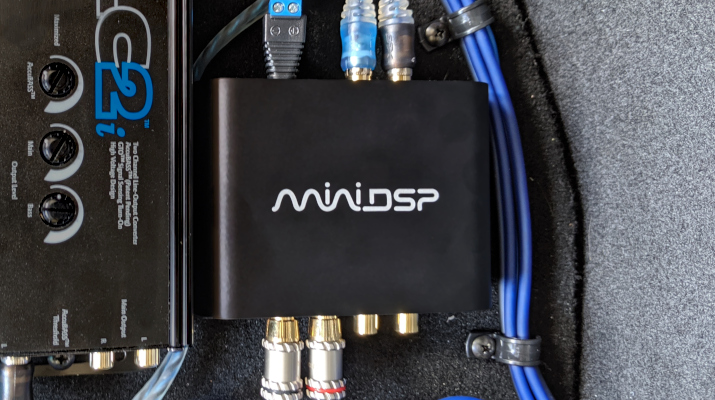
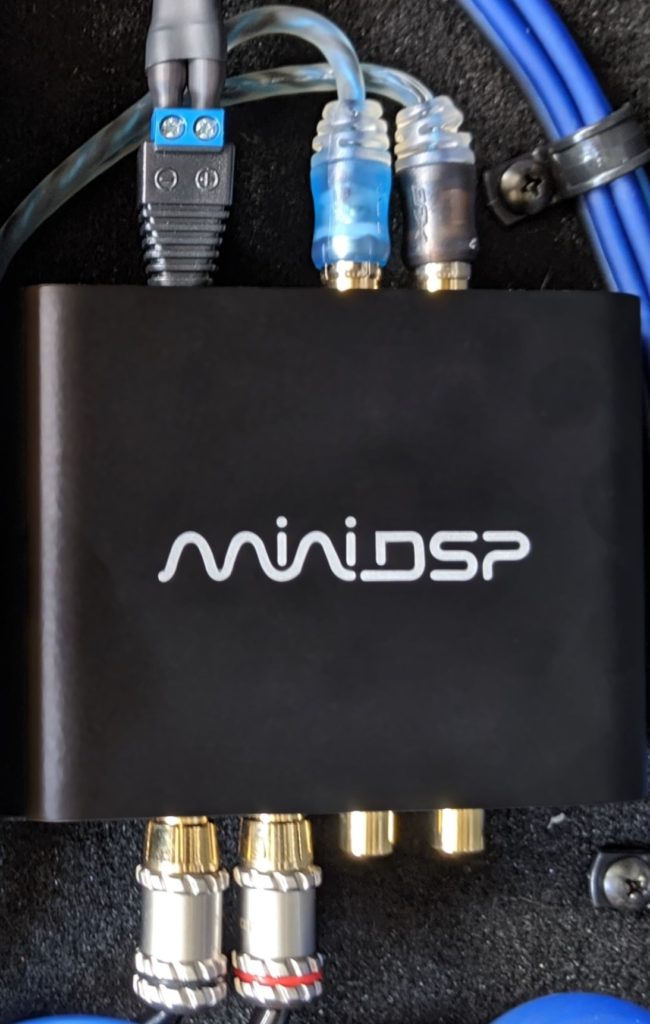
Installing the DSP is easy since it only requires 3 connections. Power is supplied via the 2.1mm barrel connector. You could supply power via the USB port, but you’d need to step 12V down to 5V and you also wouldn’t be able to connect to the device over USB to program it. The 2.1mm connectors I linked to in the parts list have screw terminals and their + and – symbols match correctly for the 2×4.
The next question is where to get power for the 2×4. Specifically, should power come from the Penthouse or from VC_LEFT? miniDSP recommends the 2×4 be powered up before and down after any other audio equipment. Since the Penthouse is turned on before and off after VC_LEFT, the Penthouse seems like the right location. With that in mind, we now have an updated wiring diagram from Part 3:
Installing the Software
As long as you’ve bought the 2×4 from a reputable dealer, it should come with a code for one free plugin. “Plugins” are pieces of software miniDSP makes to configure their hardware. miniDSP provides several different plugins, all designed for different purposes. By far the most versatile one, and the one we’ll be using, is the 2×4 Advanced Plugin. If you haven’t done so yet, use the code that came with your device to download the Advanced Plugin and get it installed now.
Initialize the Device
Now it’s time to connect the 2×4 to a USB port. In case you’re wondering, it’s perfectly OK for the 2×4 to be connected to barrel connector power and USB power at the same time. With the 2×4 connected and the miniDSP software running, click the green Synchronize button to connect to the device.
In the dialog that pops up, click Restore to Default.
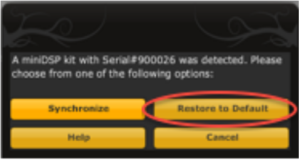
This reset only needs to be done once, and the manual makes it sound important so I don’t recommend skipping it!
Loading the Config
After the device is initialized it’s time to load the calibrated config file. But first you’ll need to download it, which you can do from here:
Back in the miniDSP software, switch to the System Settings tab and click the Load button under Load Configuration.
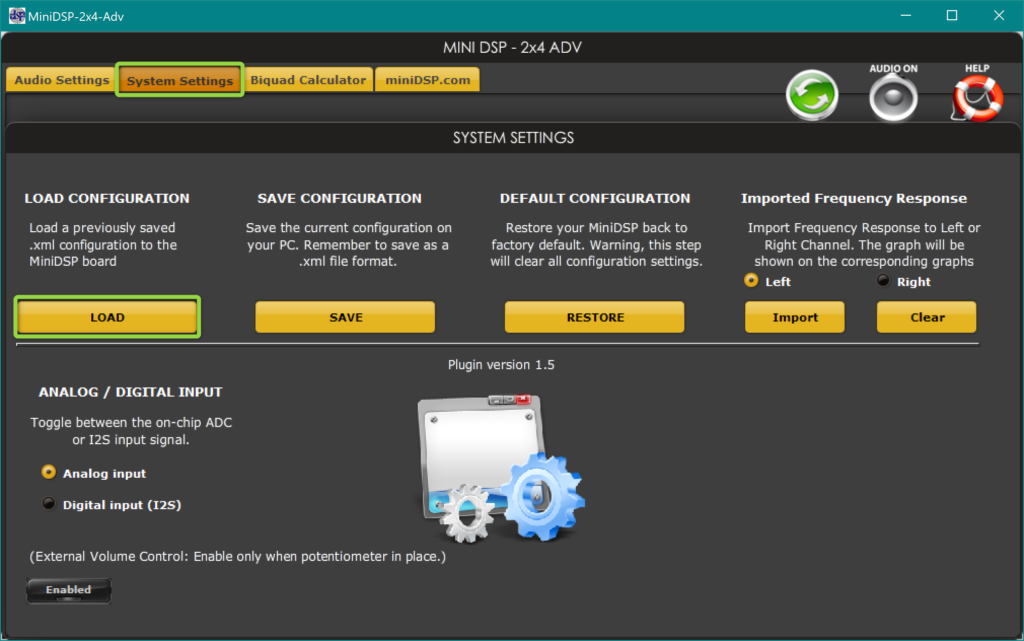
In the window that pops up, browse to the file you just downloaded and open it.
That’s it! As long as the 2×4 is currently connected via USB, you should be done! But before we connect our audio equipment, let’s go over the changes that were just made to the DSP.
Understanding the Config
The miniDSP software breaks calibration down into a set of blocks. Audio flows left to right through these blocks, and each block can be adjusted. I’ll cover the changes I made to each block, but it will make a little more sense if I bounce around a little rather than going left to right.
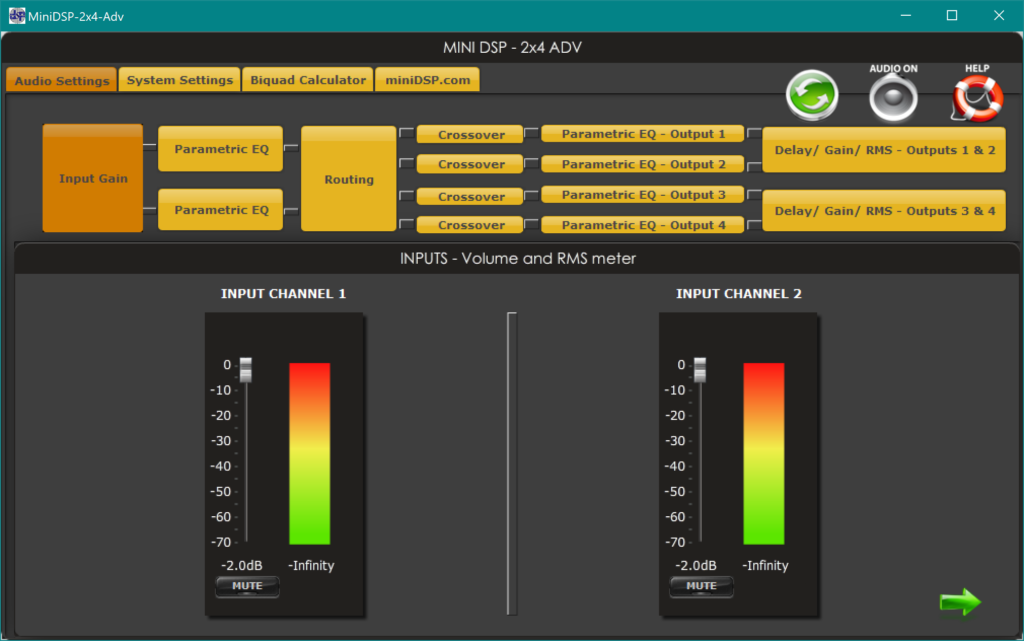
The first block is Input Gain. Here we can see Left and Right from the LC2i as Channels 1 and 2. I have both channels turned down just a hair at -2.0 dB. I did this is because I wanted a setting that was easy to remember for the physical gain knob on the LC2i. The LC2i is incredibly powerful, so even with the knob set to 25% I had to turn these down just a bit to avoid clipping.
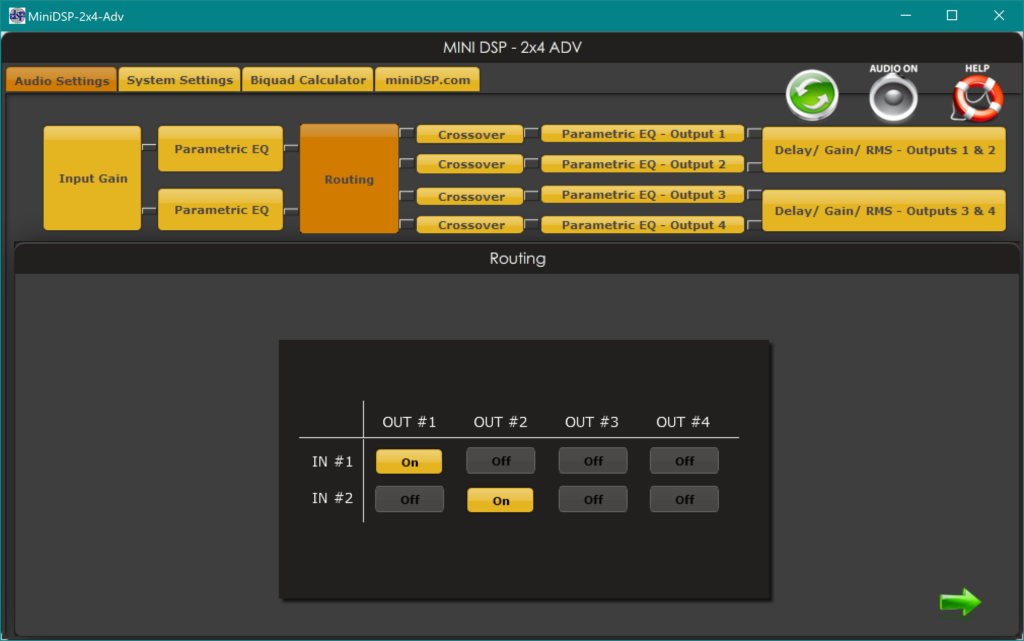
Two blocks over is Routing. This block allows us to choose how the Input jacks map to the Output jacks. The 2×4 has 2 inputs and 4 outputs (hence its name). Here I’ve mapped In 1 to Out 1 and In 2 to Out 2. (3 and 4 aren’t used.) Note that it’s possible to map one input to multiple outputs. So you could map In 1 to Out 1 and Out 2. But if you do that, be aware that you’re doubling your output signal!
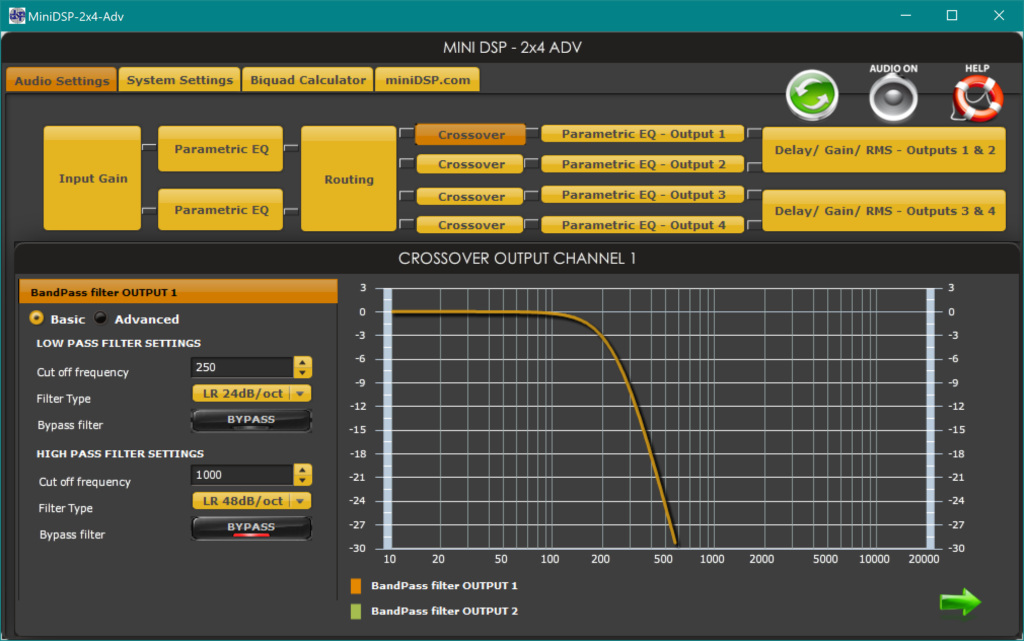
Next is the Crossover block. Note that there are four of these, one for each output. So anything done to Crossover 1 needs to be copied to Crossover 2.
This block functions like the high-pass / low-pass filter on your amplifier, but it can do advanced things like turn on high-pass and low-pass at the same time (band-pass) or control how fast frequencies roll off (slope).
For this project I set a low-pass filter at 250 Hz and chose a slope of 24 dB. 24 dB is recommended for ported enclosures, but if you have a sealed enclosure you might want to change this to 12 dB instead. If you do change it, don’t forget to change Crossover 2 as well!
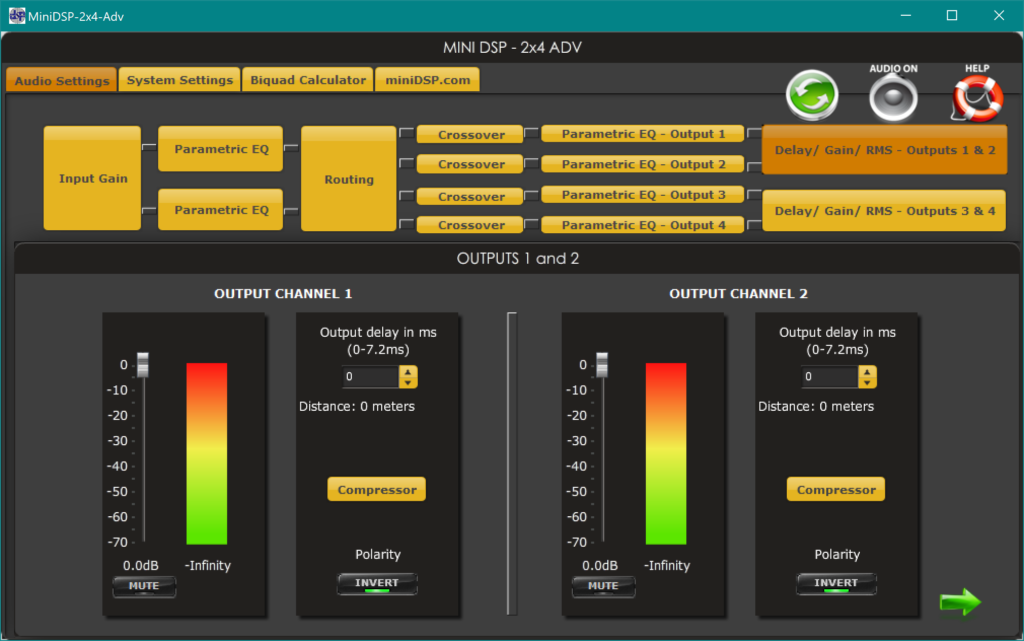
On the far right is the Output block. The gains are set at max so no change there, but notice the Invert buttons under Polarity. These buttons function like the Phase or 180 Degree switch on your amplifier. I have these set to ON because that’s what measured best in my Model 3. It will probably sound best in yours too, but you can try turning these on and off to make sure. Both buttons should be changed at the same time, otherwise the two channels will just cancel each other out!
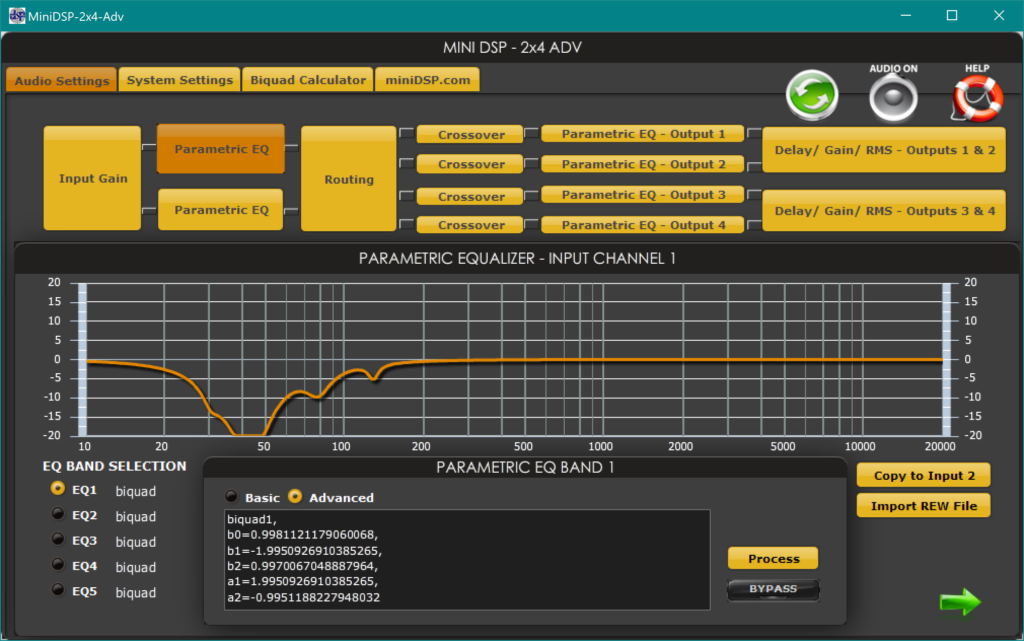
Finally we circle back to the most important block, Parametric EQ. There are two of these, one for each input. So just like Crossover, any change you make to one needs to be copied to the other. This block is where the real magic happens.
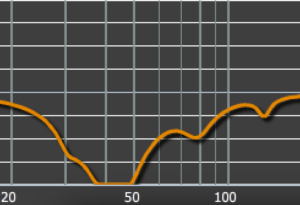
Take a look at the graph in the middle of the screen above. Does it look familiar? Earlier in this article I showed you a graph of how much louder the subs were playing above the stock audio system:
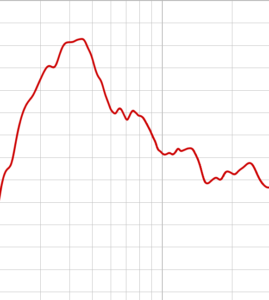
Lets look at just the subwoofer part of that graph:
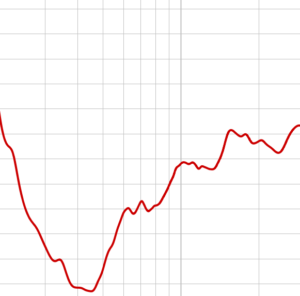
And then let’s flip it upside down:
Now does it look familiar? 😊
This is oversimplifying things a bit because we’re obviously not subtracting the entire curve. If we subtracted the entire curve you wouldn’t hear the subs at all. It’s closer to subtracting the difference between the two curves, but even that isn’t totally accurate because if we did that we’d lose the low frequencies the stock system can’t play.
The most accurate description of what we’ve done is “calibrate the subs toward a desired target response curve.” How we came up with this curve is covered in Part 8 – Calibration, but for now let’s get the equipment hooked back up and hear the difference!
Connecting the Audio
The connections are simple. The output of the LC2i connects to the input of the 2×4. The output of the 2×4 connects to the input of the subwoofer amp. Finally, we need to configure these two pieces of equipment to let the DSP do it’s best work. Here’s how I set the LC2i:
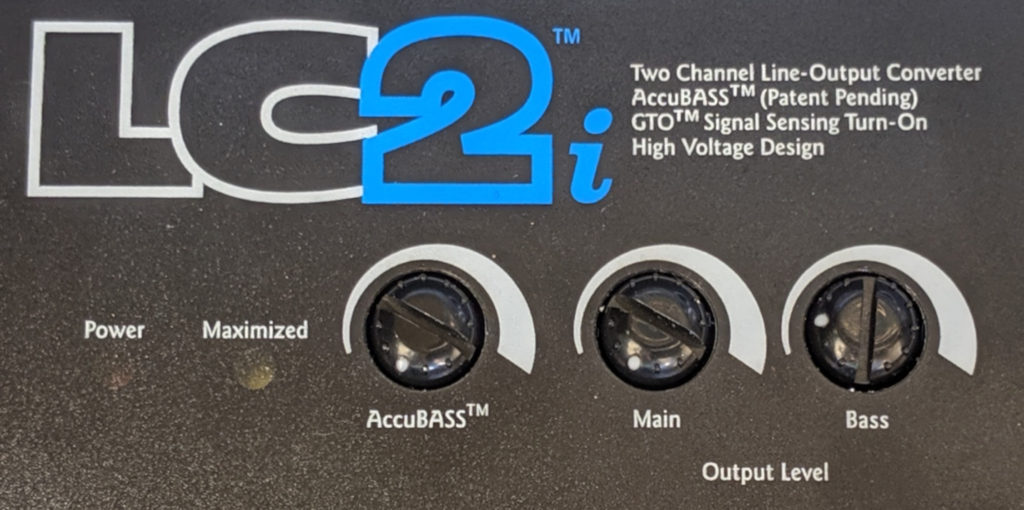
AccuBASS has been discussed many times in the forums. Some say it restores attenuated bass in the low end. Others say there is no attenuation. In my personal experience, I found that AccuBASS made the 50 Hz bump even harder to deal with. In the end, I turned off AccuBASS entirely and just let the DSP do it’s job. I’m not using the Main channel of the LC2i, and as I mentioned above the LC2i is very powerful so the Bass channel gain is only set to 25%.
Next is the amp. Here’s how I configured the HD1200/1:

Since we’re letting the DSP handle equalization, Filter Mode should be OFF. This might seem counter-intuitive at first. After all, we’re used to this switch being the primary way of making sure our subs don’t play frequencies they’re not designed to play. But that’s all taken care of in software now, and any filter you apply here would be applied on top of the filters already set in the DSP. We don’t want that.
With Filter Mode set to OFF, Filter Slope and Filter Freq. are ignored. Input Sens. (or Gain) will depend on your own amplifier and speakers. Input Voltage should be Low because the 2×4 only has a maximum output of 0.9 VRMS.
Output Polarity should be 0. Remember that the Output block of the DSP has buttons called Invert. Those buttons do the same thing as this switch, so if it’s turned on here you’ll be doing a double inversion!
Infrasonic Filter (also called Subsonic) mainly depends on your enclosure. Ported enclosures should always have this turned on since it helps protect your speakers from over-excursion. It’s less important for sealed enclosures, but it doesn’t hurt to turn it on for those too. Note that I could have included this setting in the DSP. It would have been configured in the Crossover block as a band-pass filter. I chose to leave it out since it’s based on your enclosure type and enclosure tuning, but feel free to experiment with this in the DSP.
Wrapping up
At this point you’re ready to test the DSP. Start with the Remote Level Control and the car volume both turned all the way down – just to be safe. Slowly increase and enjoy.
This project was my first attempt at programming and using a DSP. I really enjoyed the process and I am excited to share everything I learned. If you enjoyed this post or have something you’d like to add, please leave it below in the comments!
Coming up next is final post in this series. In Part 8 – Calibration I’ll share the tools and techniques used to define the desired target response curve. Stay tuned!

Thanks for all the hard work! I am attempting to tune my DSP and I wanted to download your DSP Audio Calibrated file. When I click download I am getting an invalid file type error. Can you help me get your calibrated file? Thanks again!
Hey Brooks, sorry about that! Looks like a WP plugin update changed the allowed file extensions. I think I have it fixed now so give it another try. And please let me know how it sounds!
Thanks for fixing the download, I have a M3SR+ with standard audio (no sub). I have a 12″ Rockford Fosgate in a sealed box installed in the under floor compartment in the trunk. It sounded terrible as you had referenced with huge boominess in some songs and nothing in others trying to run it without any DSP. I went with the LC2 and the MiniDSP just like you have in your configuration, and I applied your configuration to the MiniDSP and it still sounded terrible. I knew it was a long shot right out of the gate since your factory system and subs were completely different than mine, and boy was I right! Dejected I bit the bullet and bought the UMIK-1 mic, ran my baseline measurement, applied your recommended settings, watched the video, and read the MiniDSP process. First I must say thank you, I would of been totally at a loss without your in depth directions. I matched the response to target in REW using the JBL house curve, and exported the config to the MiniDSP. The results were amazing, all songs sounded exactly as I wanted them to…in fact all I needed to do was adjust the gain on my amp and LC2 until I was happy with the volume level of the sub. I have the config file for the MiniDSP you are welcome to post if you’d like, just tell me the best way to get it to you. Thanks again!
That is so awesome to read Brooks. I’m really happy the article and videos helped out. I’m sad to read that my calibration file sounded bad with your setup, but it does kind of make sense. It’s really good to hear that the process does work with other equipment and I’d be happy to host your file as well. There’s not a way to attach it here to the blog, but you can shoot me an e-mail. The e-mail is jbienz followed by hotmail and dot com. Thank you sincerely for following up and for sharing your file with others. Cheers!
I have zero car audio experience but am passionate about sound and have always had systems installed by pros in my previous ICE vehicles. I really want a subwoofer for my M3P and have spent hours in the forums looking for a safe and effective way to do so. The information is scattered and technical. With this blog you compile all that info into one very descriptive and comprehensive resource that should be canon for would-be Tesla installers. I feel like I might be able to pull this off! Thanks for all the hard work this is invaluable. Any further advice?
Those are very kind words Chuck, thank you! As for advice, I have gone back and re-read my posts a few times and I think I could probably clarify things a bit further in the latter posts around creating a DSPs. If you are building a sound system close to what I did (dual 10’s in a Premium Sound Model 3) definitely use my DSP file. If you are doing a single 10 in a Standard Sound Model 3, the user Brooks had a DSP file for that but I haven’t gotten it uploaded yet. Let me know if you need it and I’ll dig it up and post it. Best of luck on your project!